** закрыто ** Как создать пользовательскую страницу администратора для magento с пользовательской таблицей Like Sales-> gt; Orders
Поскольку я могу это сделать, я смешиваю код из 2-х ответов, чтобы сделать свою страницу
Я хочу сделать специальную страницу заказа с Моей пользовательской таблицей базы данных
Могу ли я создать новый макет страницы администрирования magento следующим образом
Я хочу макет, как эта страница
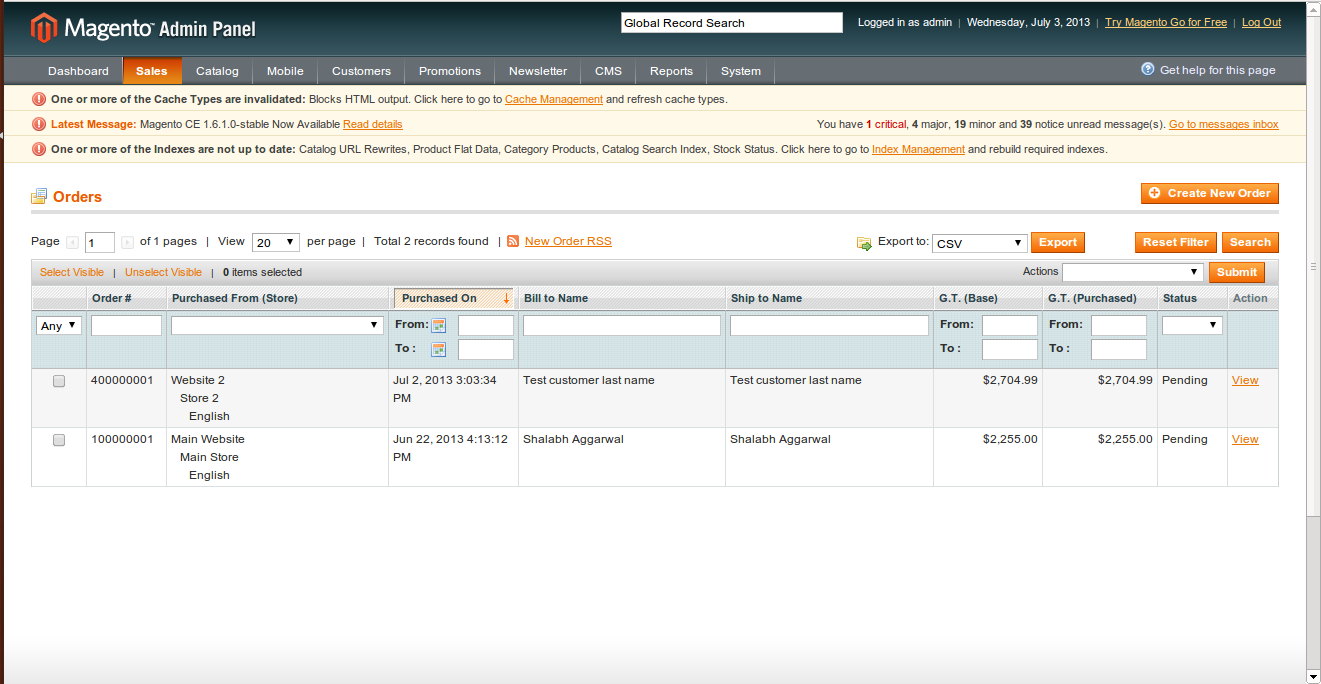
Я хочу показать
Заказы ЗаказыДата CustomerID CustomerCompany SKU ProductName Qty,
Общее состояние Действие
и имя таблицы моей базы данных является специальным заказом
в полях в таблице есть
order_no PK (from product id)
order_item_number PK (to show in Orders)
creat_date (to show in OrdersDate)
Cusid (to show in CustomerID)
Cusname (to show in CustomerCompany)
sku (to show in SKU)
Productname (to show in ProductName )
price
qty (to show in Qty,)
total_price (to show in Total)
status (to show in Status)
данные в таблице вот так (order_no + order_item_no = pk)
1 1 дата cusid cusname sku P.name цена кол-во общий статус
2 1 дата cusid cusname sku P.name цена кол-во общий статус
2 2 дата cusid cusname sku P.name цена кол-во общий статус
Как я могу использовать эту таблицу, чтобы показать на моей пользовательской странице администратора
Решение
Выполните следующие шаги, чтобы создать модуль в панели администратора с вашей пользовательской таблицей.
Создайте модуль в вашем локальном каталоге (app / code / local / Pfay / Test), где test ->.
Внутри этой структуры создайте все эти каталоги Helper и т. Д., Block, Model, Controllers.
Давайте начнем с etc и создадим файл config.xml в этой части:
<?xml version="1.0"?>
<config>
<modules>
<Pfay_Test>
<version>1.0.0</version>
</Pfay_Test>
</modules>
<global>
<blocks>
<test>
<class>Pfay_Test_Block</class>
</test>
</blocks>
<models>
<test>
<class>Pfay_Test_Model</class>
<resourceModel>test_mysql4</resourceModel>
</test>
<test_mysql4>
<class>Pfay_Test_Model_Mysql4</class>
<entities>
<test>
<table>pfay_test</table>
</test>
</entities>
</test_mysql4>
</models>
<!-- allow the plugin to read and write -->
<resources>
<!-- connection to write -->
<test_write>
<connection>
<use>core_write</use>
</connection>
</test_write>
<!-- connection to read -->
<test_read>
<connection>
<use>core_read</use>
</connection>
</test_read>
</resources>
<!-- -/- -->
</global>
<frontend>
<routers>
<routeurfrontend>
<use>standard</use>
<args>
<module>Pfay_Test</module>
<frontName>test</frontName>
</args>
</routeurfrontend>
</routers>
<layout>
<updates>
<test>
<file>test.xml</file>
</test>
</updates>
</layout>
</frontend>
<admin>
<routers>
<test>
<use>admin</use>
<args>
<module>Pfay_Test</module>
<frontName>admintest</frontName>
</args>
</test>
</routers>
</admin>
<adminhtml>
<layout>
<updates>
<test>
<file>test.xml</file>
</test>
</updates>
</layout>
<menu>
<test translate="title" module="adminhtml">
<title>Import XLS</title>
<sort_order>100</sort_order>
<children>
<set_time>
<title>Add product through XLS</title>
<action>admintest/adminhtml_index</action>
</set_time>
</children>
</test>
</menu>
</adminhtml>
</config>
Мое имя таблицы Pfay_test добавьте ваше имя таблицы вместо этого.
Теперь в контроллерах создаем каталог Adminhtml внутри этого создать создать свой контроллер IndexController.php
<?php
class Pfay_Test_Adminhtml_IndexController extends Mage_Adminhtml_Controller_Action
{
protected function _initAction()
{
$this->loadLayout()->_setActiveMenu('test/set_time')
->_addBreadcrumb('test Manager','test Manager');
return $this;
}
public function indexAction()
{
$this->_initAction();
$this->renderLayout();
}
}
где установленное время Ваше имя меню добавлено в файл config.xml.
Теперь перейдите к блоку раздела, где вы будете создавать свою Grid.
Внутри блочной директории создать Adminhtml > Grid.php
class Pfay_Test_Block_Adminhtml_Grid extends Mage_Adminhtml_Block_Widget_Grid_Container
{
public function __construct()
{
//where is the controller
$this->_controller = 'adminhtml_test';
$this->_blockGroup = 'test';
//text in the admin header
$this->_headerText = 'XLS file management';
//value of the add button

parent::__construct();
}
}
Далее создайте каталог Test> Grid.php
<?php
class Pfay_Test_Block_Adminhtml_Test_Grid extends Mage_Adminhtml_Block_Widget_Grid
{
public function __construct()
{
parent::__construct();
$this->setId('contactGrid');
$this->setDefaultSort('id_pfay_test');
$this->setDefaultDir('DESC');
$this->setSaveParametersInSession(true);
}
protected function _prepareCollection()
{
$collection = Mage::getModel('test/test')->getCollection();
$this->setCollection($collection);
return parent::_prepareCollection();
}
protected function _prepareColumns()
{
$this->addColumn('id_pfay_test',
array(
'header' => 'ID',
'align' =>'right',
'width' => '50px',
'index' => 'id_pfay_test',
));
$this->addColumn('nom',
array(
'header' => 'nom',
'align' =>'left',
'index' => 'nom',
));
$this->addColumn('prenom', array(
'header' => 'prenom',
'align' =>'left',
'index' => 'prenom',
));
$this->addColumn('telephone', array(
'header' => 'telephone',
'align' =>'left',
'index' => 'telephone',
));
return parent::_prepareColumns();
}
public function getRowUrl($row)
{
return $this->getUrl('*/*/edit', array('id' => $row->getId()));
}
}
Теперь перейдите к вашей модели внутри модели. test.php а также mysql4
В Test.php:
<?php
class Pfay_Test_Model_Test extends Mage_Core_Model_Abstract
{
public function _construct()
{
parent::_construct();
$this->_init('test/test');
}
}
Здесь (тест / тест) есть Pfay_<modulename>_Model_<modulename> -> (<modulename>/<modulename>)
Сейчас внутри Pfay > Test > Model > Mysql4 папка создания Test.php и Test
В Test.php:
<?php
class Pfay_Test_Model_Mysql4_Test extends Mage_Core_Model_Mysql4_Abstract
{
public function _construct()
{
$this->_init('test/test', 'id_pfay_test');
}
}
куда id_pfay_test это уникальный ключ вашего стола.
Pfay >Test >Model >Mysql4 >Test > create a file Collection.php

<?php
class Pfay_Test_Model_Mysql4_Test_Collection extends Mage_Core_Model_Mysql4_Collection_Abstract
{
public function _construct()
{
parent::_construct();
$this->_init('test/test');
}
}
Последний шаг — сообщите magento о вашем модуле: создайте файл Pfay_Test.xml в
/ Приложение / и т.д. / модули
<?xml version="1.0"?>
<config>
<modules>
<Pfay_Test>
<active>true</active>
<codePool>local</codePool>
</Pfay_Test>
</modules>

</config>
Замечания : Измените имя модуля и имя пакета в соответствии с вами.
Не стесняйтесь, если у вас есть какие-либо вопросы по этому поводу.
Другие решения
Попробуйте использовать встроенную сетку Magento. Чтобы не дублировать контент, попробуйте это: